Elastic Distributed Training is a technology used in AI model training to boost efficiency and flexibility. Simply put, it allows model training to dynamically adjust and utilize available computing resources based on demand, rather than being limited to a single machine or a fixed number of containers.
INFINITIX has seamlessly integrated Elastic Distributed Training into AI-Stack, supporting mainstream frameworks like Horovod, DeepSpeed, Megatron-LM, and Slurm. This effectively breaks through enterprise bottlenecks in resource scheduling and accelerates large-scale AI model training.
In this article, we will provide a step-by-step demonstration of how to use Horovod for Elastic Distributed Training on AI-Stack!
Since the operational steps for Horovod and DeepSpeed are similar, this article will use Horovod as an example. It is important to note that before you begin, you must ensure that a suitable image for the DeepSpeed or Horovod framework is available in the [Public Image List]
Horovod Elastic Distributed Training
First, after logging into the AI-Stack user interface, go to Container Management, select Distributed Training Cluster, and then click the Create Cluster button.
On the creation page, select Horovod and enter a cluster name. For this example, we will use tthvd.

Next, set the desired number of containers. For this example, we’ll enter 2 and select the required image. Please note two things here:
- The number of containers must be greater than or equal to 2, which includes one launcher container and the remaining worker containers.
- You must select an image with a training framework that matches the cluster type.

Next, click Enable GPU to select the specific GPU specifications for each container. For this example, we’ll select 1 NVIDIA-P4 GPU resource for each container. Additionally, you can choose to enable shared memory and enter the required capacity.

Next, select the storage you want to mount.

Please wait 1-2 minutes, and you will see that two containers have been created and are in the “Running” state, each with an NVIDIA-P4 GPU resource.

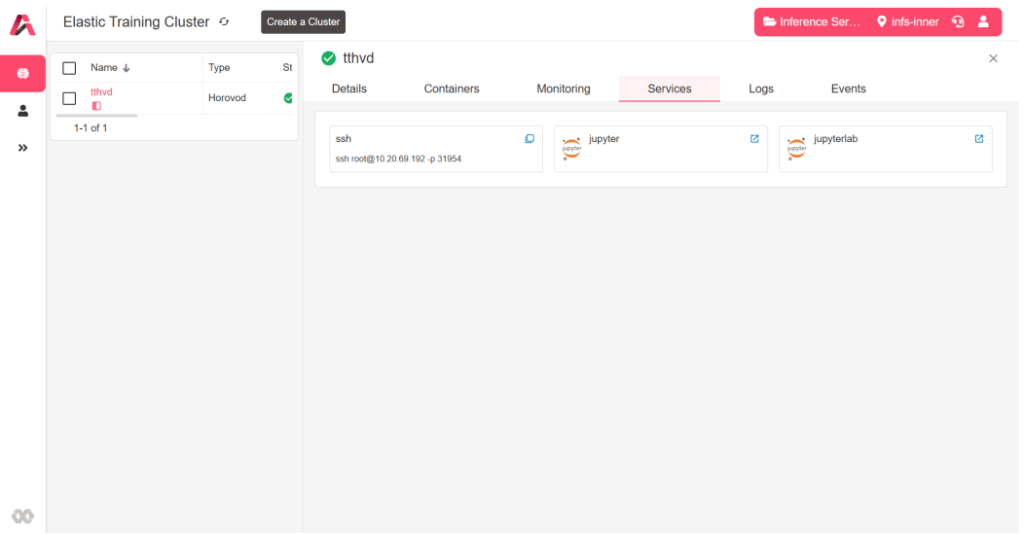
Once the cluster is ready, you can connect via SSH or the more convenient JupyterLab. For this guide, we’ll select JupyterLab.

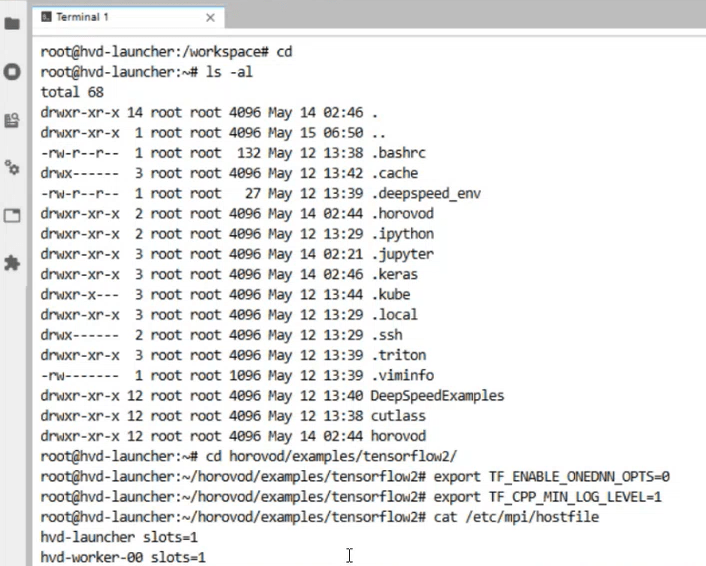
From within JupyterLab, click Terminal (this is equivalent to connecting via SSH).

Back in the home directory, you’ll see the disk volume we mounted from the external storage cluster. We’ve pre-loaded a Horovod test program, so we can proceed directly to the demonstration.

Next, we’ll run the following command to execute our training script:
horovodrun -np 2 –hostfile /etc/mpi/hostfile python tensorflow2_mnist.pyHere’s a breakdown of the command’s parameters:
- -np 2: This is an abbreviation for –num-processes, which specifies the number of Python processes to launch. We use 2 to indicate that we will use the resources of two containers for distributed computing.
- –hostfile /etc/mpi/hostfile: The hostfile describes which containers are available in the distributed cluster and how many GPUs each container has. AI-Stack automatically creates and maintains this file. The –hostfile parameter tells Horovod where to read this file so that it can use the GPU resources described within it.
- python tensorflow2_mnist.py: This is the script that will be executed.

Since our training script has a total of 10,000 data records distributed across 2 containers, you can see that each container is allocated 5,000 records for training.

We have now learned the steps for performing Horovod distributed training on AI-Stack. Next, we’ll demonstrate how to scale the containers!
AI-Stack Horovod Container Scaling
By scaling containers, you can precisely allocate resources. When you need to accelerate training, you can expand the number of containers with a single click. When training is complete, you can immediately reduce resources and release them for other tasks. This not only significantly boosts development efficiency but also effectively controls operational costs.
Now, let’s walk through a practical example to see how easy it is to scale containers with AI-Stack.
First, go back to the distributed training cluster screen, check the tthvd example cluster, and click Scale Container.

You can directly change the number of containers from 2 to 4 using the panel on the right.

After clicking Confirm, go back to the container list. You’ll see the two newly added containers. Wait 1-2 minutes for their status to update to “Running”, which means they’ve been successfully deployed. The screen will now show a total of 4 containers in the tthvd cluster.

After scaling, the hostfile will be automatically updated to include all 4 containers. Now, let’s run the same script again, but this time for 4 containers.
horovodrun -np 4 –hostfile /etc/mpi/hostfile python tensorflow2_mist.pyWith the same 10,000 data records distributed across 4 containers, each container now trains on 2,500 records, and the overall training speed is faster.

That’s the process for using Horovod on AI-Stack! Our platform allows data scientists to easily create and scale containers, saving a significant amount of time and making the training process much more convenient.
To learn more about Elastic Distributed Training, check out our article: “What is Elastic Distributed Training? Building a New Model for More Efficient AI Training.“
If you’d like to learn more about the AI-Stack solution, please feel free to contact us!


